Photoshop’s eraser tool are available in the 2nd number of icons within the toolbox. It’s three variations: Eraser, Background Eraser and Magic Eraser.
The eraser is essentially a brush which erases pixels while you drag it over the image. Pixels are erased to transparency, or even the background colour when the layer is locked.
Whenever you choose the eraser tool, you’ve various possibilities present in the toolbar:
Brush: Options include how big the eraser, hardness of edges as well as other styles. Brush choices are unavailable in block mode.
Mode: You will find three options: brush (soft edges), pencil (hard edges) and block (square brush size).
Opacity: 100% opacity erases pixels completely, % doesn’t erase whatsoever. 50% is semi-transparent (or coloured). Opacity isn’t obtainable in block mode.
Flow: Determines how rapidly the erasure is used through the brush. Lower settings create a more subtle effect. Only accessible in brush mode.
Airbrush: Make use of the eraser being an airbrush. Only accessible in brush mode.
Erase to History: Erases to some saved condition or snapshot from the image. To make use of this selection, click on the left column within the history palette near the preferred condition.
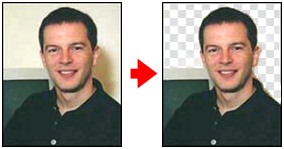
Background Eraser Tool
The background eraser tool enables you to definitely take away the background colour from your image or layer. Whenever you click on the image, the eraser samples the color in the center from the brush and erases this color while you drag. Options present in the toolbar permit you to specify the kind of erasure, colour tolerance and sampling method.
Magic Eraser Tool
The magic eraser tool erases all colours inside a set tolerance. This really is basically just like while using magic wand and hitting Delete . By using this tool you don’t have to drag — simply click once.
Source: www.mediacollege.com