Navigation article:
- +FREE downloadable practice sheets!
- What’s modern calligraphy, and just how it is different from traditional scripts for example copperplate, or spencerian
- What tools you’ll be requiring – recommendations
- Some structural guidelines – they all are quite simple to know plus they apply across all the techniques we’re going discuss
- Popular modern calligraphy techniques – 3 variations to get you began!
- Free downloadable practice sheets 🙂
- So, what’s modern calligraphy and just how will it vary from traditional calligraphic scripts?
- What tools will i requirement for modern calligraphy?
- This is a listing of probably the most popular tools for contemporary calligraphy –
- STRUCTURAL GROUND RULE
- Here you will get some FREE practice sheets, and all of them is split through the number of letters.
- POPULAR MODERN CALLIGRAPHY TECHNIQUES
- Final ideas about modern calligraphy
- How You Can ADD SHADOWS For Your LETTERING (5 AWESOME WAYS)
- DEVBRUSH 3. FOR PROCREATE – REVIEW
- Related Posts
- HOW To Produce A Hands LETTERING MURAL
- What’s BRUSH CALLIGRAPHY?
- DEVBRUSH 3. FOR PROCREATE – REVIEW
- 1 EASY TIP Which Will Enhance Your LETTERING COMPOSITION
- Comments 5
- Leave an answer Cancel reply
- Keep in touch!
- Who’re we?
- Lettering Daily
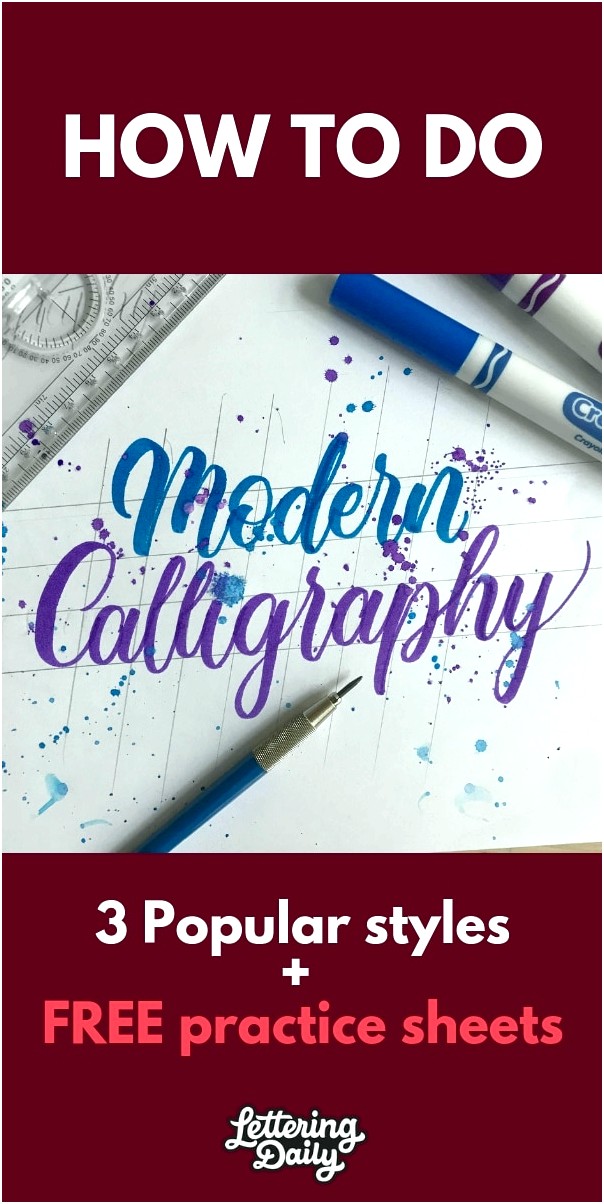
+FREE downloadable practice sheets!
Welcome back for an additional tutorial!
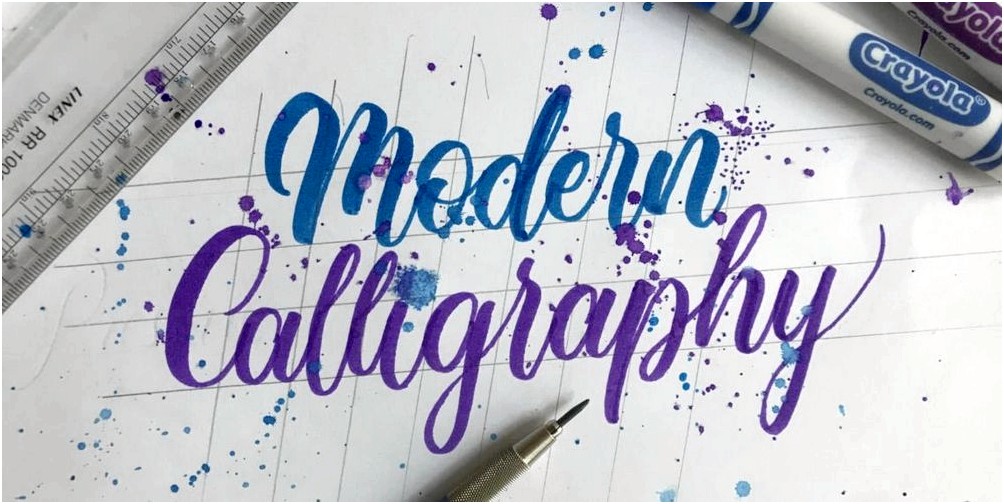
This can be a beginners guide for individuals searching to understand more about modern calligraphy.
This is a brief summarize by what you will learn today-
What’s modern calligraphy, and just how it is different from traditional scripts for example copperplate, or spencerian
What tools you’ll be requiring – recommendations
Some structural guidelines – they all are quite simple to know plus they apply across all the techniques we’re going discuss
Popular modern calligraphy techniques – 3 variations to get you began!
Free downloadable practice sheets 🙂
Pin me!
So, what’s modern calligraphy and just how will it vary from traditional calligraphic scripts?
To tell the truth, it’s really hard to provide you with a precise meaning of what modern calligraphy really is (you will find just a wide variety of styles, techniques etc.), however, to make a obvious distinction
modern calligraphy is regarded as any kind of calligraphy that doesn’t stick to the structural rules of calligraphy – for example Copperplate or even the Spencerian script.
The thing is,
The factor is the fact that traditional calligraphic scripts (like the one pointed out above) are controlled by specific, structured, individual strokes that form different letters.
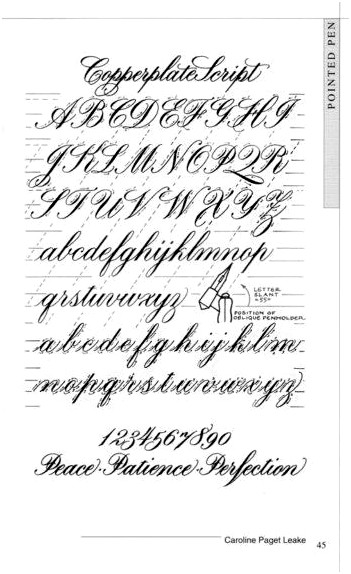
It is really an illustration of the Copperplate script-
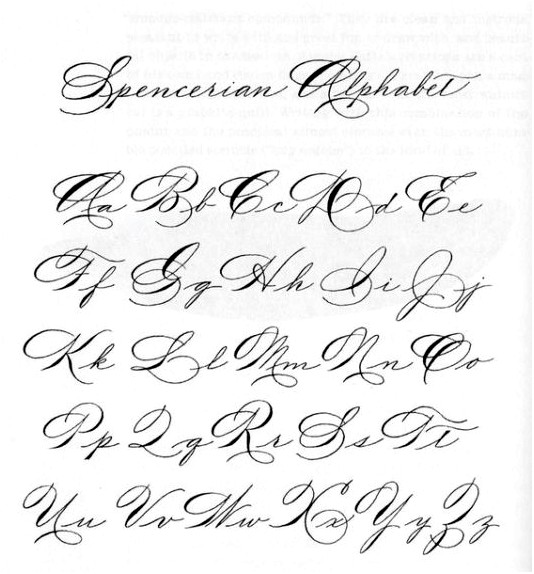
Here is another illustration of the Spencerian script –
To create this complete story a lot more comprehensive, modern calligraphy is essentially a method which has no such rules and provides the absolute freedom of following, let’s refer to it as your personal calligraphic intuition 😀
When i state ‘’the absolute freedom’’ i do not really mean that you could just start scribbling random shapes and refer to it as modern calligraphy 😀
There are several fundamental guidelines that needs to be applied to be able to conserve a visual harmony.
Take it easy we’ll cover them in a couple of moments and you’ll certainly have the ability to understand all of them in addition to put them into action inside your work!
Note – these guidelines may appear a little complicated (especially if you’re a complete beginner) but simply have patience and stay with them. With more experience and time that it will explore your routine to the stage that you simply wont even be considering them!
Before we break lower these rules, we wish to possess a quick consider the tools that we will be requiring.
What tools will i requirement for modern calligraphy?
Since we revealed that modern calligraphy provides you with the potential of breaking from the structural rules, we are able to mention a couple of great tools for contemporary calligraphy.
The liberty of following ideas is yet another benefit because it enables you to employ an even bigger number of lettering tools!
When you train with a conventional calligraphic script like the Copperplate script, you’re tied to utilize a dip pen (oblique holder).
Possibly you can handle to make use of longer brush pen or perhaps a customized brush pen for that iPad pro, but you’re indeed limited with the option of your tool.
Modern calligraphy however provides you with the chance to make use of absolutely any lettering tool imaginable –
actually, you may also create modern calligraphy having a rock that leaves an indication on the ground 😀
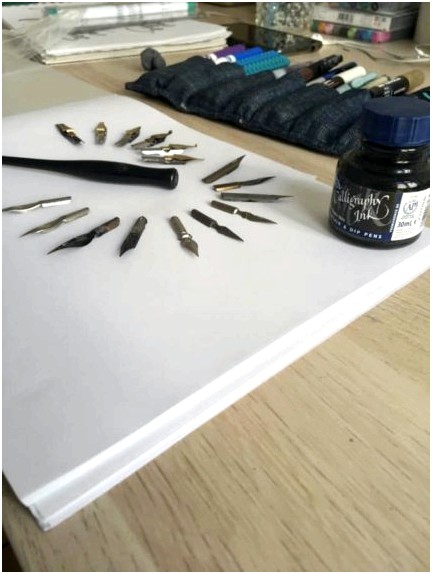
This is a listing of probably the most popular tools for contemporary calligraphy –
1. Dip pens – straight holders and oblique holders.
The standard calligraphy tools truly are a terrific way to begin with modern calligraphy.
It will have a learning curve when it comes to becoming accustomed to holding it properly, however the very positive aspect would be that the calligraphy nibs are made in a manner that, if you apply pressure towards the nib the 2 points will separate providing you with a thicker stroke, while when designing the upstrokes you’ll always have that perfect little difference a.k.a – hairline.
We spoken concerning the thick and thins in our previous tutorials – Brush lettering for novices, one step-by-step guide.
Listed here are a couple of other activities you should know about dip pens –
- You have to ready your nibs – new nibs have a thin layer of coating that stops rusting and that should be removed with – water, alcohol, mouthwash, saliva etc. You will find a real couple of different ways you are able to make that happen, even by sticking them right into a potato! 😀
- How you hold your pen – you would like both ideas to touch the paper therefore the ink can run easily, this is why you need to tilt a little the paper to get that correct position.
- The way you sit – yup! it has an excellent effect on your calligraphy overall. Not frequently pointed out, however if you simply are hunched while writing it’ll certainly possess a negative effect on your lettering. We really covered el born area within our piece of 5 strategies for brush lettering – take a look!
- Obtaining the right combination – it’s very common for novices to manage ink flow issues, and often it’s because of the wrong mixture of tools.
Take it easy,
we’ll mention a couple of so that you can easily get began!
Dip pen calligraphy is really a subject that we’re intending to cover soon, and you may already know it, you want to pack it with valuable info. where many of these things we pointed out above, is going to be described in-depth 🙂
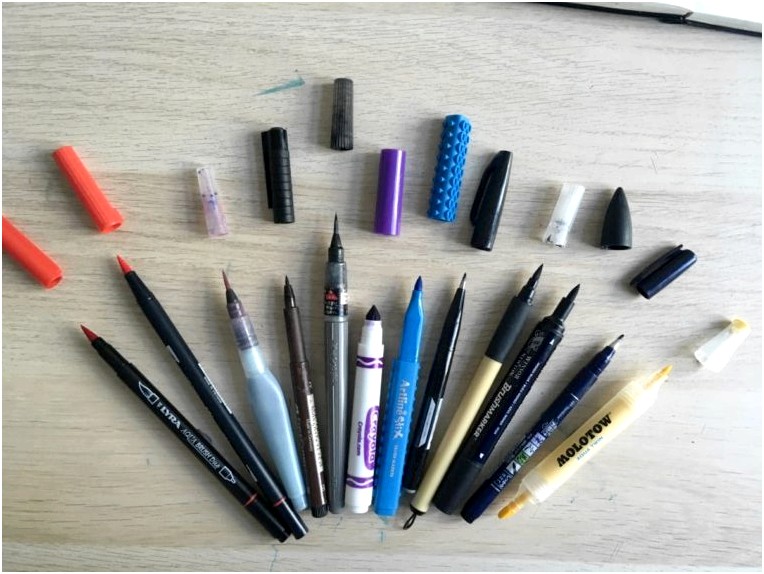
2.Brush pens!
Most likely probably the most famous lettering tool, the comb pen is actually a great artistic medium (not only for lettering)
Strengths of the brush pen are –
User ambiance – remember we pointed out earlier that there’s a learning curve using the dip pens? Well, brush pens do not have that whatsoever!
The flexible nibs are often controlled with pressure and they’re extremely affordable.
Other strengths are a lot of colours which you’ll easily blend.
If you’re searching to test newer and more effective brush pens certainly take a look on the previous reviews on the very best brush pens for lettering.
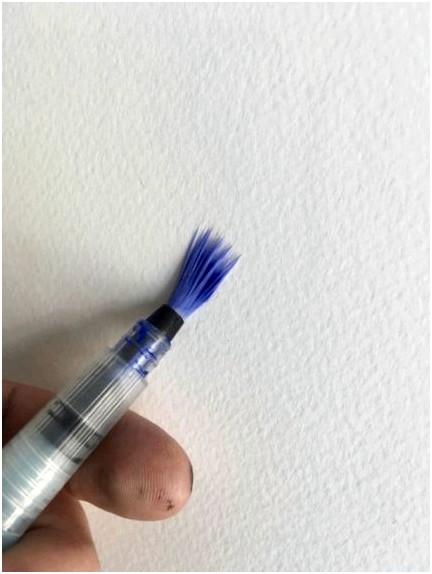
3.Water brush pen – Aquash
This bad boy is definitely an amazing tool!
The reservoir full of water (or color) enables you to definitely practice with watercolors completely care free!
You will discover much more about the aquash along with other brush pens in our reviews here.
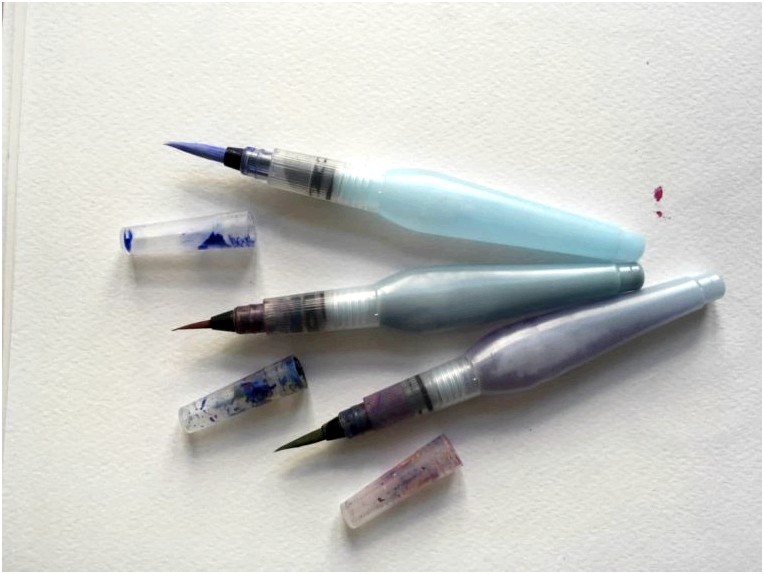
The fine and lengthy synthetic hairs can produce a number of stroke sizes that will grant you extra freedom when designing your personal lettering pieces.
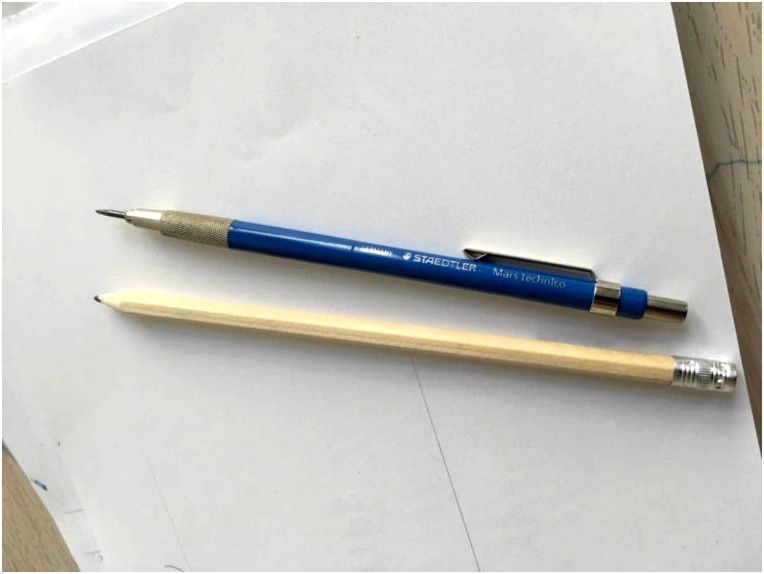
4.The pencil!!
It is really a crucial part associated with a lettering toolbox.
The pencil has a wide variety of uses, from sketching, creating guidelines all of the to making smooth calligraphy! – When designing some calligraphy or some lettering, you will find 3 methods for you to make use of your pencil for this –
- Faux (fake) Calligraphy – we’ll discuss it soon
- Calligraphy according to stroke pressure – yes, the pencil can make the the years strokes, however, you will not have the ability to get it done on the massive (unless of course you’ve got a really big pencil)
- Hands lettering – illustrating each shape individually
With regards to the pencil, we advise an easy HB pencil or perhaps a mechanical pencil such as the Staedtler Mars 780 Technical Mechanical Pencil
Keep in mind to not underestimate the need for the pencil 😀
5. Various markers and ballpoint pens
Mostly employed for creating Faux Calligraphy along with other types of modern calligraphy,
These markers can certainly be considered a welcome addition for your lettering. Adding effects, patterns, colors, virtually something that involves the mind, is among the benefits whenever using modern calligraphy.
Because there are a lot of different pens and types you could utilize, we’re just likely to list a couple of in our favorites –
A couple of honorable mentions!
The moving ruler – Very first time i learned about it had been within the amazing tutorial about blackletter calligraphy compiled by Edgar
It is INSANELY useful! It will help mostly with the development of the rules which may be completed in seconds with this particular nifty tool 😀
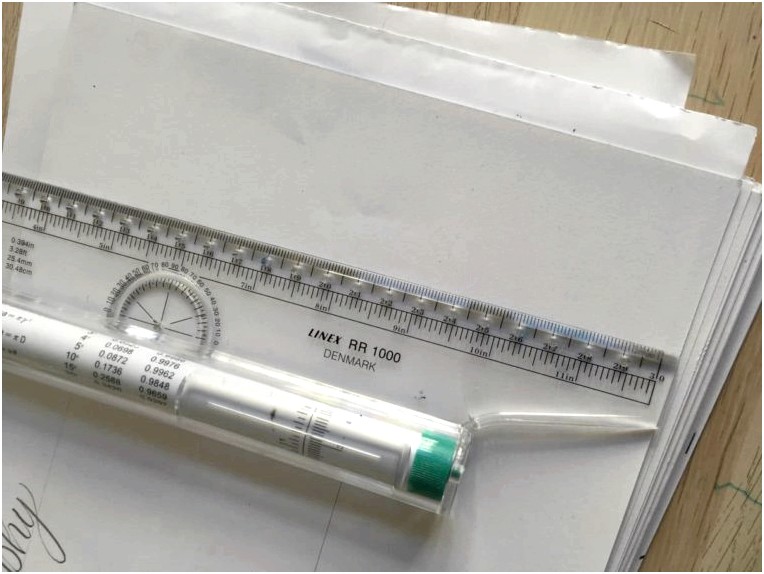
The Crayola marker! – Thinking about that this isn’t technically a brush pen, it may still produce the awesome the years effect!
it’s soooooo cheap. 😀
This can be a High recommendation for anybody who would like to give modern calligraphy a go!
STRUCTURAL GROUND RULE
We guaranteed this will probably be easy 😀
There’s two various things i’d like you to definitely keep close track of. I would suggest you to definitely start applying them As soon as possible, possibly the adjustment will feel weird initially but in no time you’re going to get accustomed to it.
Obviously, there are more elements too that matter, but i have faith that both of these situations are somewhat the basic principles which with more experience and time you’ll start realizing and learning other essential elements in calligraphy and lettering.
So, these are –
- Consistency – This doesn’t only make reference to the position from the letters but in addition for stroke thickness, balance, flourishing etc.
Being that we’re speaking about modern calligraphy you will find styles that tweak these fundamental rules too, but it’s important to not overload by using it and also to know your work
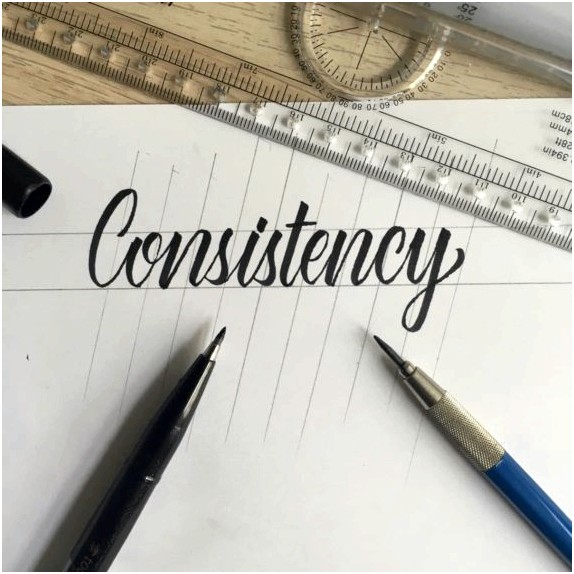
So, how you can remain consistent?
The most typical advice you learn about lettering and calligraphy would be to practice, A Great Deal!
Well, this really is certainly among the reason.
By practicing you develop muscle memory which in turn manifests inside your lettering as well as your general progress.
There’s a couple of tips when you’re just beginning out –
- Go slow and spend some time, this gives you the opportunity to concentrate on your downstrokes and to ensure that they’re consistent
- Divide your strokes – remember, calligraphy isn’t like writing in cursive having a normal pen. Here you are able to spend some time and concentrate on gaining consistency using your piece
- Notice around the image above the way the guidelines solved the problem using the position from the letters (almost :D) I can’t really stress enough how useful guidelines are!
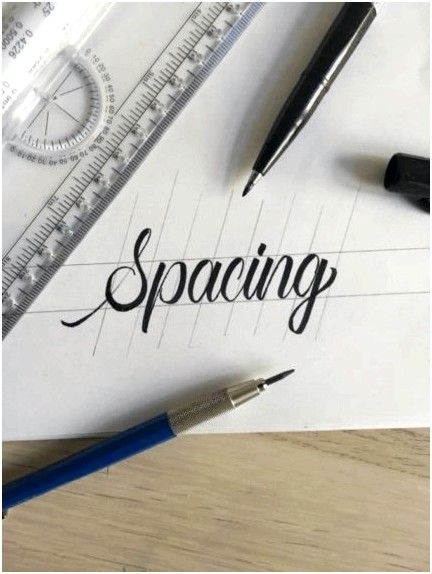
- Letter spacing –
This really is something which also takes a little time to get accustomed to it, but being conscious of it, it’s likely to be very useful for you personally!
Readability is most likely probably the most main reasons with regards to lettering, and letter spacing includes a direct effect on it.
How you can enhance your spacing?
That just about with consistency, spend some time out on another hurry it. Observe each and former stroke and also the distance in the previous one.
Dont add too much by using it tho 😀
A great drill for this is to perform a couple of lower strokes (faster) in a single line (photo) and attempting to keep a regular spacing in between each stroke.
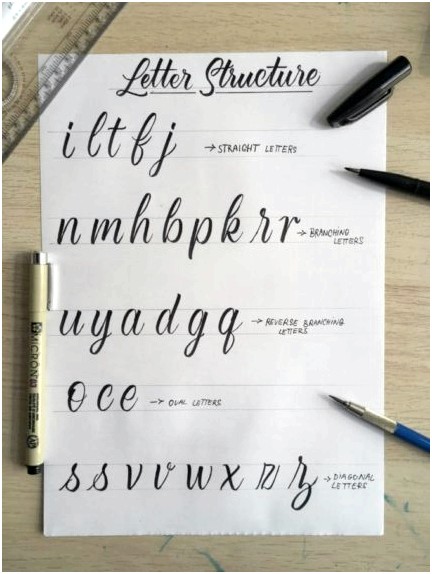
- Letter structure!
Now let’s make things even simpler!
Most likely in your own life you were able to observe that some letters act like others, we may use this to the advantage!
Whenever you practice letters which share similarities within their form, you’ll be able to practice that consistency i was speaking about earlier.
Bear in mind this only applies for minuscules (small) letters
So, we’ve 5 different letter groups –
- Straight letters – i, l, t, f,
- Branching letters – n, m, h, b, p, k, r
- Reverse Branching letters – u, y, a, d, g, q
- Oblong letters – o, c, e
- Diagonal letters – s, v, w, x, z
Here you will get some FREE practice sheets, and all of them is split through the number of letters.
POPULAR MODERN CALLIGRAPHY TECHNIQUES
Since we covered the main difference between traditional calligraphy, the appropriate tools and a few fundamental guidelines, we are able to finally proceed to learning some popular modern calligraphy techniques!
Today we will cover three different modern calligraphy techniques that people can quite frequently notice across social networking platforms.
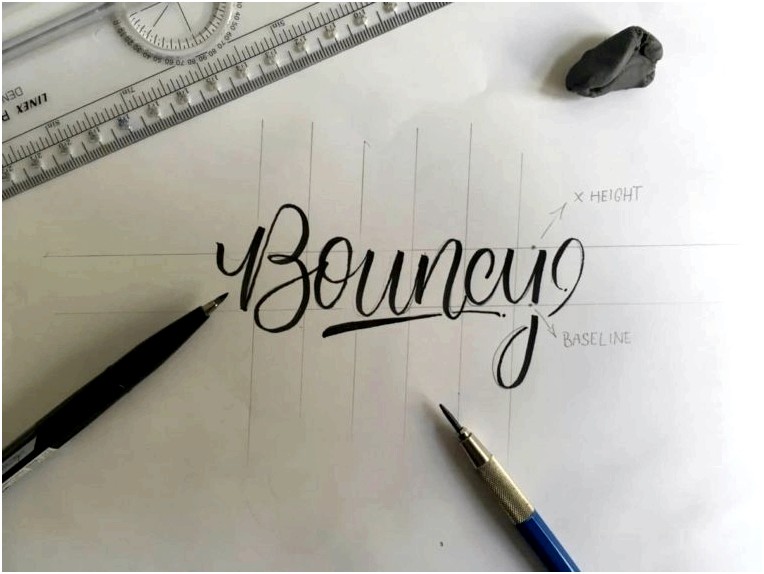
Bounce lettering
You’ve most likely first viewed it or learned about it, and bounce lettering is an ideal illustration of modern calligraphy – there’s an apparent (visual) difference from traditional calligraphy scripts.
After you have understood the floor rules (that people spoken about earlier), and the way to handle pressure of the brush pen or perhaps a dip pen, bounce lettering is very easy and fun to complete!
It’s known as bounce lettering, since the letters just do that, they bounce!
So, how you can do bounce lettering?
Once more, because this really is modern calligraphy there isn’t a rigid rule with this style, but nevertheless listed here are a couple of steps to help you get began.
Step One –
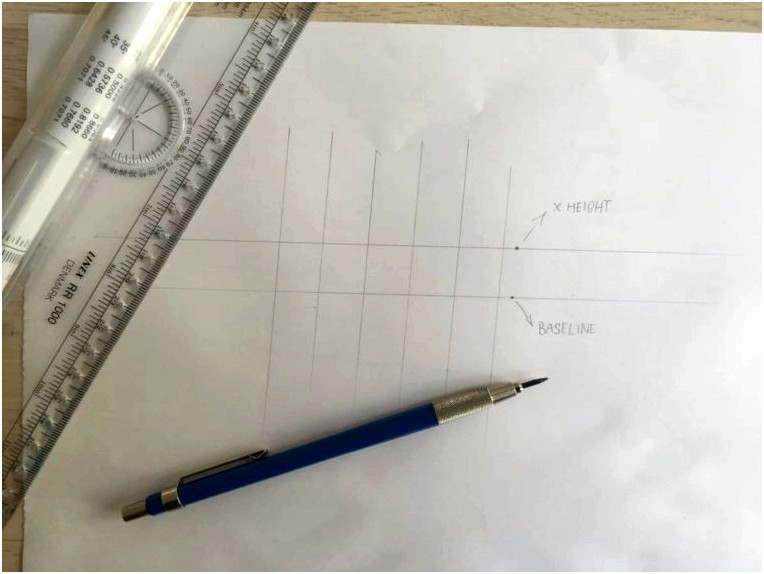
draw some light guidelines having a pencil, it is simple to do that freehand.
Step Two –
Make use of your pencil to produce a rough and lightweight version (don’t press way too hard, it will likely be simpler to get rid of it later on) from the lettering.
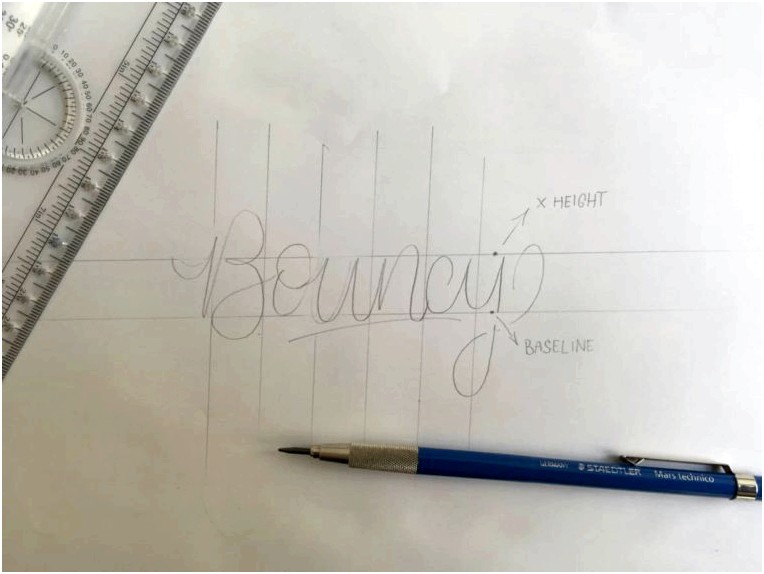
Traditional calligraphy follows the road from the baseline, and therefore all the letters are located on the baseline and achieve the x height using the upper part.
With bounce lettering you essentially alter that, and also you place some letters above and underneath the x-height and also the baseline
Step Three –
Time to talk about it having a brush pen, dip pen, water brush etc. To begin with i suggest you attempting to do fundamental patterns to get the sensation from it.
What i’m saying with that would be to perform the following – every second letter goes a little underneath the baseline. Then consider adding some letter exceeding beyond the x height and so forth.
Tip – avoid keep 3 letters consecutively going underneath the baseline after which maintaining your rest normal.
When you feel at ease with simple patterns, attempt to create them by yourself 🙂
Step Four –
erase your formerly made pencil guidelines.
Practicing is about learning from mistakes, don’t get frustrated should you aren’t feeling your initial style. Most of us have been there…
It will lead you a couple of times of consistent practice to be able to develop a minimum of that initial muscle memory.
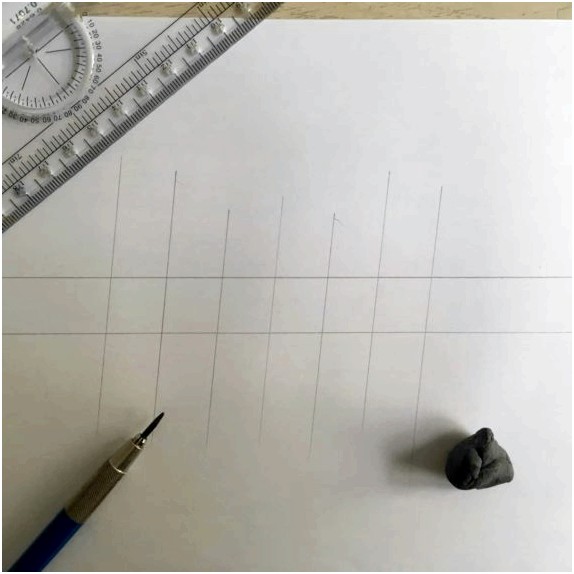
Faux Calligraphy
Also referred to as fake calligraphy, a great way to boost your practice routine, one last pieces or simply in situation it’s not necessary any brush pens around.
It’s fairly simple to do, take a look –
Step One –
We always recommend creating some guidelines. This really is whenever you will begin to spot the awesome advantage of the moving ruler 😀
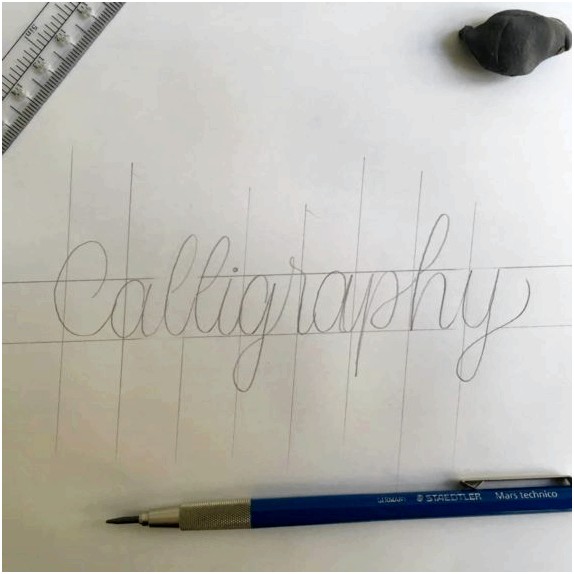
Step Two –
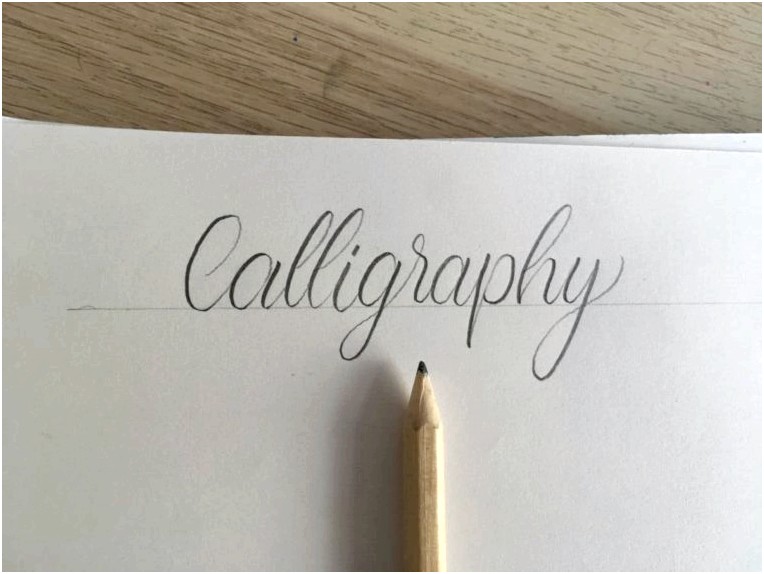
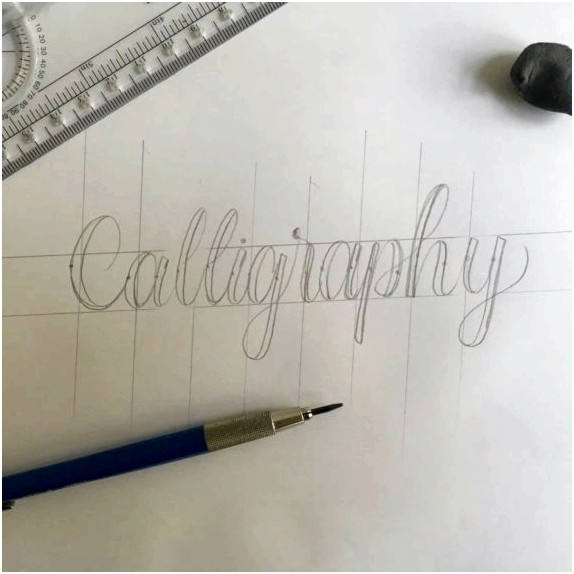
Pick your word, i made the decision to choose the term ”Calligraphy” (clever huh?)
Write it in one stroke inside a cursive style like so –
Step Three –
Identify where would be the downstrokes!
This may appear a little challenging for many beginners, but you’ll actually notice following a couple of days or days of practicing, that you’ll virtually commit to memory in which the downstrokes come in every letter.
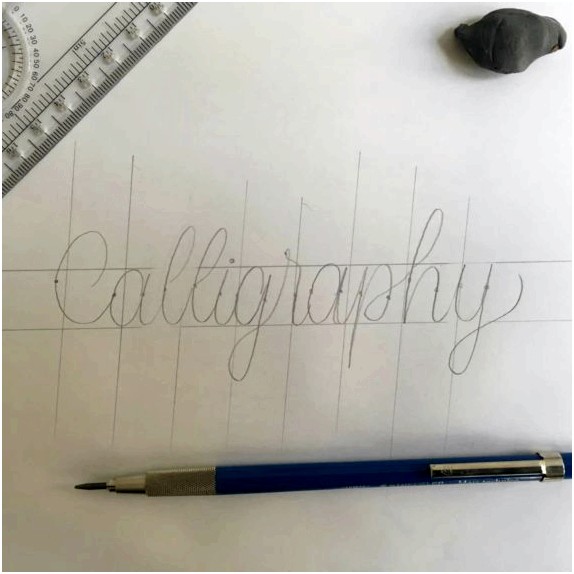
Tip – a typical problem with faux calligraphy is spacing.
The problem seems if you’re not adding weight consistently and therefore some letters will in the finish appear closer than the others.
While you remember we pointed out that spacing one of the letters really are a among the guidelines.
Keep practicing, test out thinner and thicker markers. Mind to Pinterest and Instagram and then try to have some inspiration – don’t steal the other party’s artwork but attempt to recreate them in your way.
Get the marker, pen, pencil and begin hearing aid technology pencil sketch you’ve made –
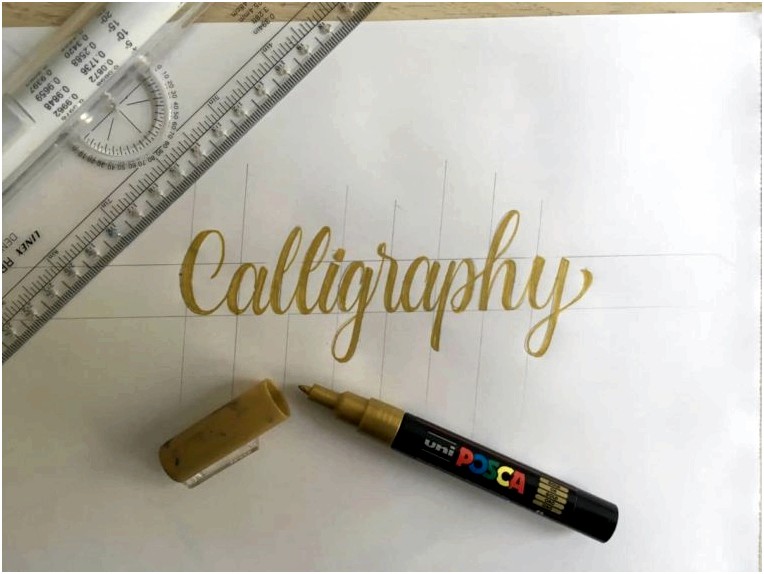
Add something extra?
Possibly you can include some shadows, or some patterns. Perhaps a second word?
The options are actually endless. Gather some inspiration and begin testing variations and methods!
Just be sure you erase the pencil guidelines.
Distant Lettering
Not necessarily confident that there’s another reputation for this method (if there’s, make sure to drop a remark below) however i made the decision to mention it such as this because it’s the nearest word to explain the design and style.
Distant lettering is very popular and it is something we’ve been seeing online quite a bit.
So this is a quick tutorial regarding how to create this kind of lettering (kind of lettering – have it? huehue)
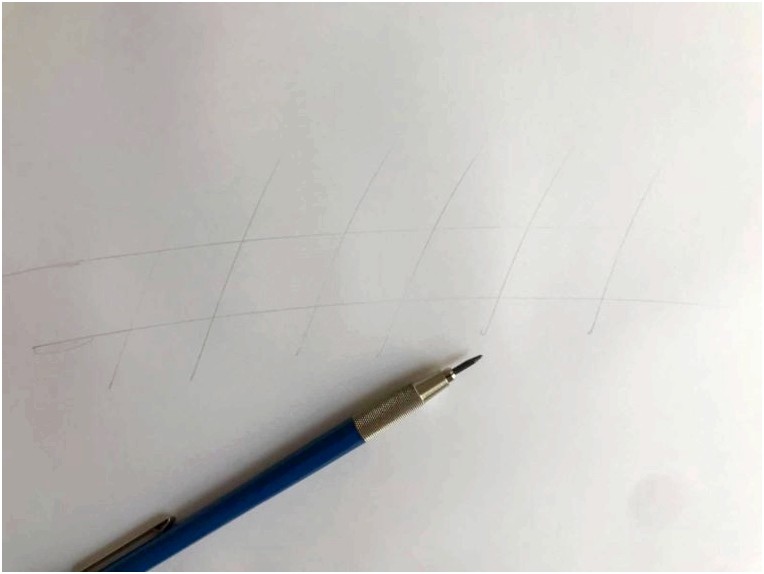
Step One –
get the buddy mister pencil out and begin drawing individuals guidelines – lightly!
Observe that within this one the rules are created free hands? Case to inform you that you simply don’t necessary require a ruler constantly. Guidelines aren’t here so you’ve to strictly follow them (particularly in modern calligraphy)
They’re for your assistance, so certainly make the most of that!
Step Two – draw your letter but rather of ending the bond carefully as if you usually do attempt to increase it a little more
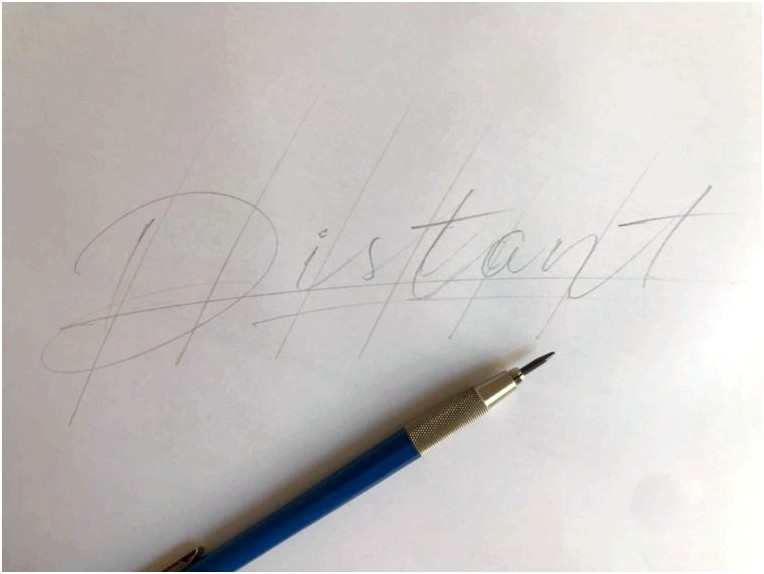
Step Three – keep close track of the duration of your connection strokes and then try to have them consistent across your lettering.
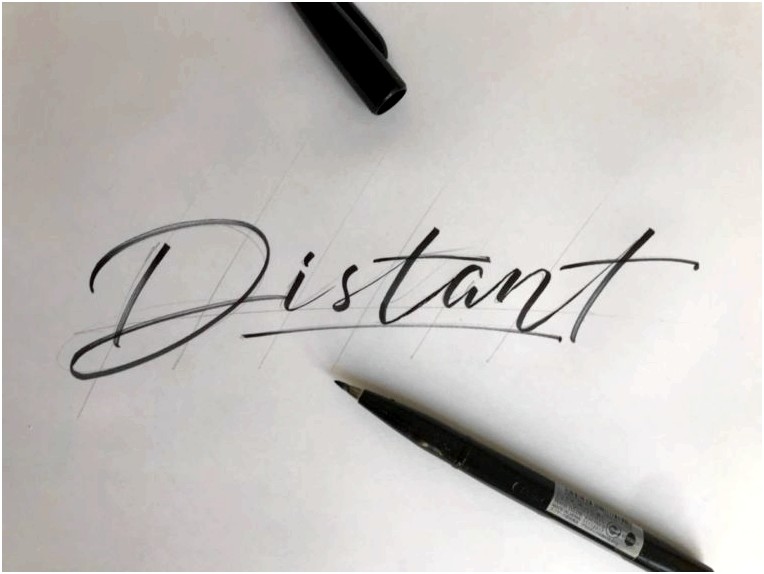
Step Four – erase your pencil marks.
Final ideas about modern calligraphy
You need to certainly try to mix they!
For instance you can test to complete some bouncy lettering having a ballpoint pen by creating some faux calligraphy.
However that you can do the fuax calligraphy around the distant lettering, possibly doing a bit of bouncy distant lettering 😀
Remember, modern calligraphy is all about bending the standard rules and providing yourself the liberty of testing new style and methods!
Just keep close track of that consistency and also the letter spacing and you’ll improve considerably faster.
Keep practicing, and make certain to talk about you’re employed on the website forum and obtain featured on the Instagram page! (Browse the guidelines :D)
Stay AWESOME!
Stay updated with Lettering Daily, enable notifications rather than miss a brand new publish!
How You Can ADD SHADOWS For Your LETTERING (5 AWESOME WAYS)
DEVBRUSH 3. FOR PROCREATE – REVIEW
Related Posts
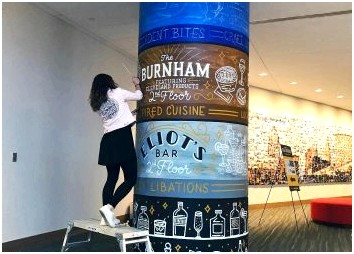
HOW To Produce A Hands LETTERING MURAL

What’s BRUSH CALLIGRAPHY?
DEVBRUSH 3. FOR PROCREATE – REVIEW
1 EASY TIP Which Will Enhance Your LETTERING COMPOSITION
Comments 5
Modern calligraphy that’s succeeded and it is legible does follow rules. You Have To discover the rules to interrupt the guidelines!
Ok. I must be honest. Your tutorials really inspire to rehearse. ☺️😆. And That I mean print the practice sheets and employ guidelines kind of practice. You are making everything easy and clear to see. 👍
hahah! Thanks Stephanie 🙂 Im really glad it’s that impact on you – which was precisely the point!
Keep practicing and make certain to talk about a number of your projects on the forum. Once per week we share our favorites on the Instagram feed 🙂
I love find out more about calligraphy should you more information or you have lettering practice sheet. Suppose you’ve more lettering style please show me paper out lettering sheet thank yo7
Thanks Lucy,
You’ll find the practice sheets within this tutorial – they must be somewhere in the centre 🙂
Leave an answer Cancel reply
This website uses Akismet to lessen junk e-mail. Find out how your comment information is processed.
Keep in touch!
Who’re we?
Lettering Daily
Lettering Daily is definitely an network that gives educational and inspirational content on hands lettering and calligraphy.
Our mission would be to help artists and enthusiasts from all across the globe to understand and enhance their hands lettering and calligraphy skills. You want to produce a community where individuals can learn, grow, share and network together!
Source: www.lettering-daily.com